![]()
Advanced Solutions for Flight Simulation

Installing The G1000 Into Other MSFS & P3D Aircraft |
|||||||||||||||||||||||||||||||||||||||||||||||||||||||||||||||||||||||||||
 |
|||||||||||||||||||||||||||||||||||||||||||||||||||||||||||||||||||||||||||
| At
the bottom of this page you will find several example panel.cfg files
that use the G1000. Please be sure you understand the panel.cfg
entries and the 5th parameter described in the sections below before you
try to modify your own cockpit panels.
As with most things in flight simulator, it's better to take something that already works, make a copy of it, and then modify the copy to suit your needs. This is especially true when modifying cockpit panel layouts. Always backup your work, and leave a "clean" copy of files in a safe location so you can always reverse your changes and restore the sim to its original state if necessary. How The G1000 Is Different From Other Avionics Most avionics instruments operate the same way no matter what aircraft they appear in. But this is not true for the G1000. Garmin allows individual aircraft manufacturers to customize the G1000 system to their airframe. This is especially evident in the engine pages, but you can also see it on the PFD with the presence or absence of various options and functions based on the aircraft being flown. Our G1000 software was designed to emulate this behavior. The gauges you will see below that comprise the G1000 avionics suite will change their behavior based on aircraft specified n the G1000.INI. At this time, the Mindstar Aviation G1000 software can be configured to represent 20 different aircraft, with more being added all the time Some of these are intended for generic use, and some are designed to represent a specific aircraft. The available styles are: |
|||||||||||||||||||||||||||||||||||||||||||||||||||||||||||||||||||||||||||
|
Beechcraft (Generic) Beechcraft Baron Beechcraft Bonanza Cessna 172S Cessna 182T Cessna Turbo 182T Cessna 206 Cessna Turbo 206 Cessna Caravan Cessna Citation Mustang Columbia Cirrus SR-20 Cirrus SR-22 Cirrus SR22 Turbo Diamond DA-40 Diamond DA-42 (Thielert Diesel) Diamond DA-42 (Lycoming IO360) Mooney Piper Archer Piper Meridian Piper Mirage Piper Matrix Piper Seminole Piper Seneca Generic Twin Turbine Generic Twin Turbine 'B' Tecnam P2006T Tecnam P2010 |
|||||||||||||||||||||||||||||||||||||||||||||||||||||||||||||||||||||||||||
|
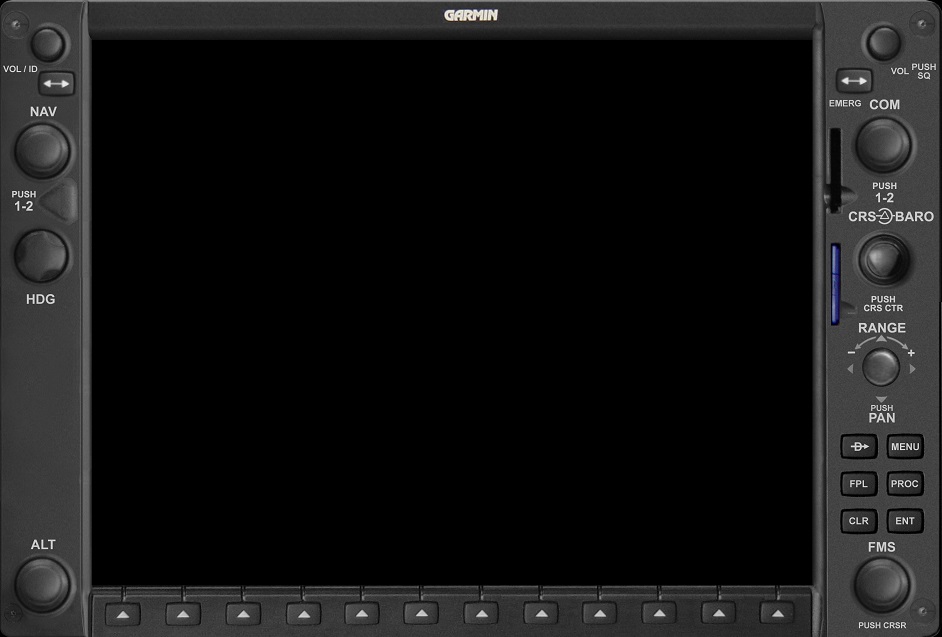
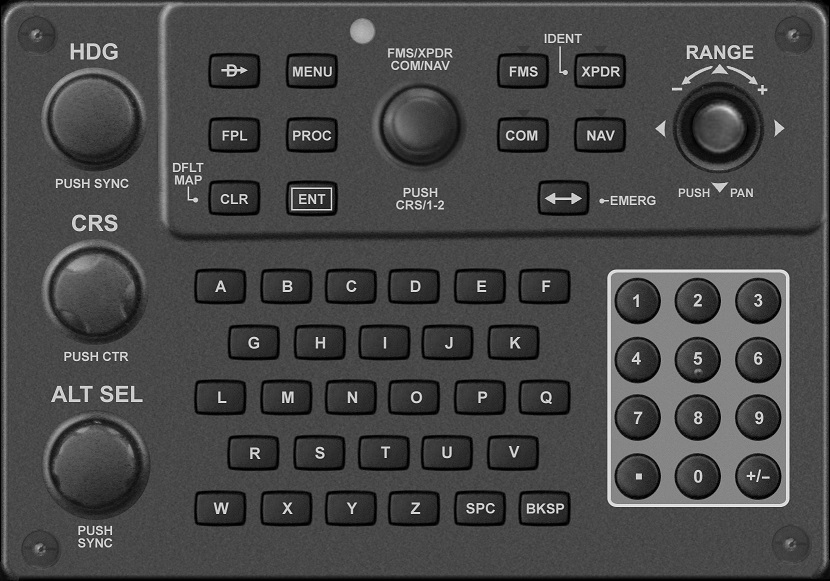
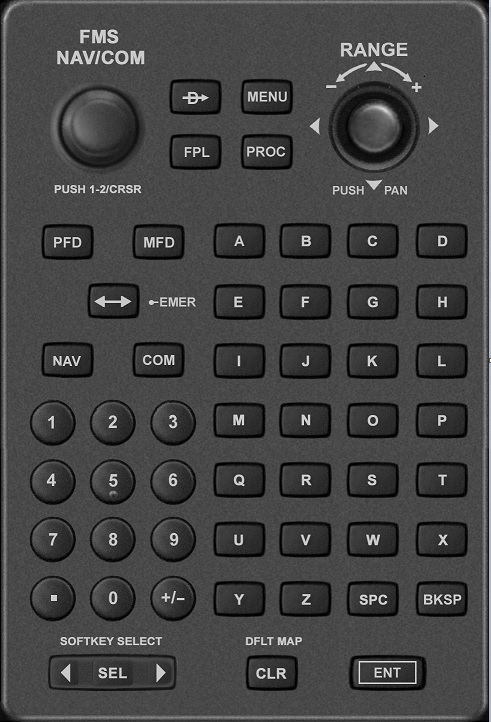
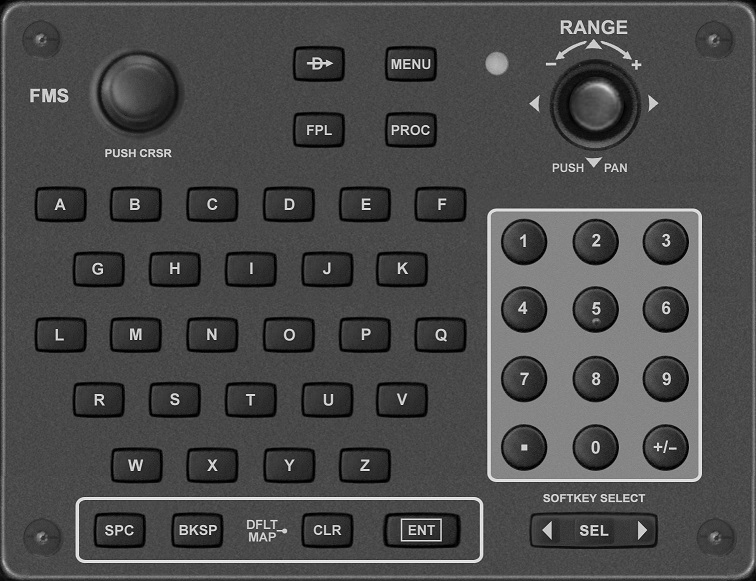
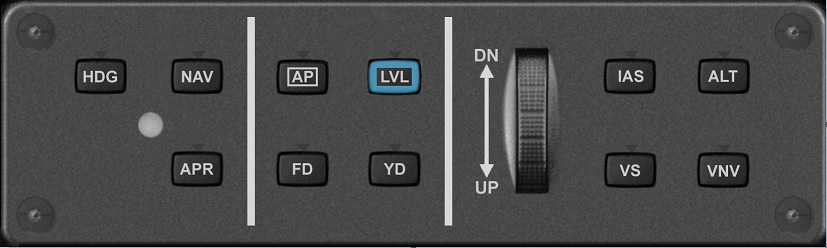
The G1000.INI File The starting point for configuring G1000 cockpits is the G1000.INI file. This is a plain text file. It can be edited with Notepad. It can be found in the folder you selected during the installation of the software. Typically this would be C: \ Program Files (x86) \ Mindstar \ Flight Simulator Addons \ G1000.INI. There is so much information in the G1000.INI that we have dedicated an entire page to explaining the various options. You can read more details about the G1000.INI here. But for the purposes of configuring panels, you simply need to decide which aircraft section name from the G1000.INI you plan to use. Once you have decided that, you can proceed to the next step of modifying the panel.cfg of your aircraft. Components of the G1000 Integtrated Avionics Suite The Mindstar G1000 is located in a gauge file named MPI_G1000.gau. This file is automatically placed into the simulators' gauges folder at the time of registration. The MPI_G1000.gau file contains several individual gauges that are used as part of the integrated G1000 avionics suite. Not all these gauges are appropriate for every aircraft. You should do your best to build a cockpit using a real-world aircraft as a guide. You may run into difficulties if you try to mix-and-match G1000 components into a single panel when they are intended for different types of airplanes (i.e. piston vs turboprop vs jet). The individual gauge names available inside MPI_G1000.gau are:
Syntax Format for PANEL.CFG The normal syntax for entering gauges into the panel.cfg would be similar to this format: gauge00=MPI_G1000!PFD, X, Y, Width, Height, [required 5th parameter] gauge01=MPI_G1000!MFD, X, Y, Width, Height, [required 5th parameter] gauge02=MPI_G1000!AUDIO, X, Y, Width, Height, [required 5th parameter]
The 5th parameter is required on the gauge lines for the PFD, MFD, RFD, and Audio gauges. The rest of the G1000 gauges in the list do not utilize the 5th parameter at all. The 5th parameter for these gauges consists of two "words", separated by a pipe-symbol "|" (on your keyboard, the pipe-symbol is the shifted backslash). FirstWord | SecondWord There must be no spaces between the first word, pipe-symbol, and second word.
XXX# The possible values of XXX are gauge codes such as: PFD MFD AUD followed by one of the following numbers: 0 means 2D cockpit 1 means popup panel 2 means VC Be extra careful that you properly match PFD0, or PFD1, or PFD2 on a gauge line that refers to a PFD, and on the proper type of panel section in the panel.cfg You will get unexpected results if you don't match up the 5th parameter with the proper type of gauge and panel.
Example Cockpit Configurations These examples are all using the FSX 172, which is the default airplane our installer puts the G1000 into. Since Microsoft did not include a 182 in FSX, our installer drops an old FS9 compatible 182 onto FSX machines, but since this aircraft was intended for FS9, it doesn't have a compatible VC. Consequently, the 182 can only show the G1000 in the 2D cockpit. Also note that Lockheed-Martin does not put any Cessna aircraft into Prepar3D, so you will need to modify your desired aircraft manually by following the examples on this page. If you own FSX, consider dropping the C172 aircraft container and related gauges into your Prepar3D SimObjects\Airplanes and Gauges folders. It seems to work properly, and gives you a way to have a Cessna 172 in Prepar3D. Microsoft's old FS9 182 does not seem to work with Prepar3D, and we have seen it cause Prepar3D to crash. Example - Cessna 172 2D Cockpit with G1000 [Window00] file=panel_background_640.bmp file_1024=Cessna_G1K_Panel_FSX.bmp size_mm=1024 position=7 visible=1 ident=MAIN_PANEL gauge00=Cessna!Master_Alt_Bat,8, 377 gauge01=Cessna!Avionics Switch,50, 377 gauge02=Cessna!Starter,90,377 gauge03=Cessna182s!Switches,7,432 gauge04=Bendix_King_Radio!Bendix-King Radio AP, 140, 395, 205 gauge05=MPI_G1000!PFD, 0, 35, 484, 329, PFD0|Cessna.172 gauge06=MPI_G1000!AUDIO, 484, 35, 55, 329, AUD0|Cessna.172 gauge07=MPI_G1000!MFD, 540, 35, 485, 329, MFD0|Cessna.172 gauge08=Cessna!Airspeed, 350, 370,100,100 gauge09=Cessna!Attitude, 462, 370,100,100 gauge10=Cessna!Altimeter, 575, 370, 100,100 gauge11=Cessna172!Thrust_Controls,680,390 gauge12=Cessna!Fuel_Selector, 807, 390, 50, 50 gauge13=SimIcons!Kneeboard Icon, 927, 455 gauge14=SimIcons!ATC Icon, 942, 455 gauge15=SimIcons!Map Icon, 957, 455 gauge16=SimIcons!Avionics Icon, 972, 455 gauge17=SimIcons!Compass Icon, 987, 455 gauge18=Cessna!Cowl_Flaps,900,390, 30, 50 gauge19=Cessna!Pitch_Trim, 942, 392 gauge20=Cessna!Flaps,975,385, 40, 60 Example - Cessna 172 Popup Window with G1000 //-------------------------------------------------------- // Popup Window PFD [Window04] Background_color=0,0,0 size_mm=813,550 window_size_ratio=1.000 position=6 visible=0 // The Mindstar G1000 requires the popup PFD to have an ident code of 11000 ident=11000 gauge00=MPI_G1000!PFD, 0, 0, 813, 550, PFD1|Cessna.172 //-------------------------------------------------------- // Popup Window MFD [Window05] Background_color=0,0,0 size_mm=813,550 window_size_ratio=1.000 position=8 visible=0 // The Mindstar G1000 requires the popup MFD to have an ident code of 11001 ident=11001 gauge00=MPI_G1000!MFD, 0, 0, 813, 550, MFD1|Cessna.172 //------------------------------------------------------------------ Example - Cessna 172 3D/VC Cockpit with G1000 Note - your level of success when putting the G1000 in the VC is completely dependent on who designed the aircraft you are instaling it into. Please refer any questions to your aircraft model manufactuerer. We cannot help with this since we do not make the aircraft model. [VCockpit01] size_mm=1024,1024 pixel_size=1024,1024 texture=$C172_G1000 background_color=42,42,40 gauge00=MPI_G1000!MFD, 0,0,765,500, MFD2|Cessna.172 gauge01=MPI_G1000!AUDIO, 779,513,97,511,AUD2|Cessna.172 gauge02=MPI_G1000!PFD, 0,514,765,500, PFD2|Cessna.172 |
|||||||||||||||||||||||||||||||||||||||||||||||||||||||||||||||||||||||||||